Quilling Paper Art Step by Step
Paper Quilling Instructions
Footstep past Stride Image Tutorial
These paper quilling instructions volition help youget started on the astonishing art or paper quilling.
Got your quilling tool, strips of quilling paper and some glue to mitt?
Quilling isn't a difficult craft, merely information technology tin can take a piffling practice to get the tension right. So permit's exercise!
Have a strip of quilling paper and tear information technology in half, or even quarters. Do non cutting information technology with pair of scissors as the sharp edge volition exist more noticeable in the finished shape. The soft, torn edge is less visible.
I would advise you to begin with the slotted quilling tool that is normally provided in a quilling starter kit. Later you may want to motility on to using a needle tool or toothpick. A good tip to keep in mind is that when using the slotted tool y'all turn the tool, whereas with the needle tool you lot roll the paper around the tool, keeping the tool still.
Paper quilling instructions - Rolling your first coil
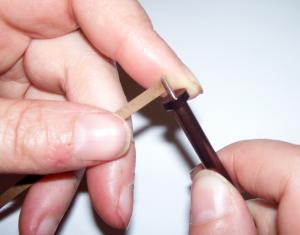 So accept your piece of paper and gently put the finish into the slot in the tool. Make certain that but the tiniest bit of paper protrudes through to the other side of the slot.
Then, property the tool in your dominant hand and the newspaper between your other thumb and alphabetize finger, slowly turn the quilling tool so that the paper winds evenly effectually the tip.
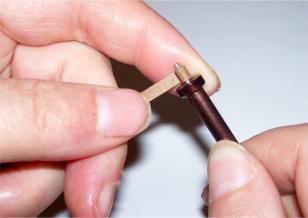 Try to go on the edges of the paper lined upward. Keep some tension on the newspaper as you are turning the tool, merely don't tug also hard or you lot may tear it!
When your quarter length strip is all wound around the tool hold information technology in identify for a moment then that the paper can "remember" its position. Then allow go and plough the tool upside down, allowing the quilled ringlet to fall off onto the table. The newspaper will begin to uncoil a little, don't panic, it is supposed to practice that. Leave it to "relax" a niggling and and so when it stops uncoiling use a toothpick with a tiny dot of tacky glue on the end to stick the finish of the newspaper in place. Hold the paper together for a moment or ii until the gum dries.
As nosotros are practicing, selection another color of paper and make another curlicue. Brand perhaps a dozen before we move onto the next phase.
Paper quilling instructions - Shaping your coils
Sometimes you volition desire to leave your coils as circles, but often yous will clasp and manipulate them into unlike shapes to build upward your flick. Nosotros will start with the easiest shape.

The teardrop
Pick up your coil and with the pollex and index finger pinch it together forming a shape with a point at one finish and leaving the other end rounded. This is a useful shape for flower petals.
The petal
Taking your teardrop shape, gently printing your pointed terminate to one side to curve it over.
The marquise or center shape
Take another coil and this time hold it between the pollex and alphabetize fingers of both hands. Pinch tightly with both hands to course points at each end. The marquise is i of the most useful shapes in quilling.
The leaf
Brand another marquise just this time after pinching the ends move them in opposite directions creating a twist in the shape.
The one-half moon or crescent
You volition need your quilling tool over again for this shape. Have 1 of your coils and push the handle of the tool into the circle, squeezing the 2 ends to class points.
The triangle
A slightly tricky one this time. Holding the circle between your index fingers of each hand, push button the bottom of the circle up with your thumbs to create a triangle. Pinch the three corners to sharpen them upwardly.
The tulip
Starting time by making the teardrop shape but before letting become of the pinched end push button it dorsum into the master function of the circle to class an indentation. Sharpen up the two outside points if required only they can be left rounded.
Bunny ear or shield
Similar in advent to the crescent, this shape is fabricated without using the quilling tool as a former. Holding the coil in one mitt utilise the index finger on the other hand to push an indentation into the circumvolve. Then pinch the 2 resulting points to sharpen up the shape and make the ears.
The arrow
Offset brand a teardrop by pinching one end. And then, holding the pinched cease, apply your finger to push button the other stop towards your other mitt forming an indentation. Compression the points to sharpen up the shape.
The star
Make a marquise as before, then turn the shape ninety degrees and repeat, pinching two more than points to brand a star. Press hard at each point to sharpen upwardly the shape.
The square
This ane needs both thumbs and both index fingers! Hold the circle between all four digits and gently press into a foursquare shape. Squeeze each corner to transform your circle into a square.
The holly leaf
A pair of pointed craft tweezers are useful when making this shape which is, of course, groovy for quilled Christmas cards.
Squeeze your circumvolve together in the middle using your tweezers. Using your fingers pinch 1 stop and push it towards the center, repeat at other stop to form a holly foliage shape.
Paper quilling instructions - Making a tight gyre and variations
We missed out the get-go analogy in the photo to a higher place. The tight ringlet is the easiest of all to make. Wrap the paper effectually the quilling needle as before but before taking it off the tool gum the end in place. Hold it for a few seconds to let the glue to dry out earlier gently releasing it from the tool.
Fringed flowers
Using the same technique as above for the tight coil but with wider paper nosotros tin make a fringed blossom or pompom. Start by cut small-scale snips into one edge of the paper at regular intervals all the mode along its length. And so roll a tight roll and glue the unsnipped section. Gently spread the snipped section to produce a fluffy effect.
Fringed flowers with centers
To create a flower with a unlike colored center accept a 3mm broad strip in yellow or a suitable color and glue a snipped wider length of newspaper in the flower colour of your choice to the end. Commencement rolling from the narrow end and continue rolling when yous reach the snipped paper. Glue as before and so spread open the snipped flower leaving a prissy tight center.
Newspaper quilling instructions - Open curl
Open coils or scrollwork can add a frail affect to a quilled item. This time we do not glue the end of the paper strip once information technology is coiled.
Open circle
Piece of cake one! Just roll equally normal only after leaving it to relax do not glue the end.Open up coils or gyre work tin can add together a fragile touch to a quilled particular. This time nosotros exercise not glue the end of the paper strip once information technology is coiled.
Open up circle
Easy ane! Just coil as normal only after leaving information technology to relax do not glue the stop.
Open heart
Take your length of quilling paper and fold it in one-half. Curl from i finish in towards the fold line until a small-scale section of paper is left preceding the fold. Practise the same for the other finish. Try to leave the same amount of free newspaper on each side of the heart so that it lines up nicely when finished.
Open up V
Worked in the same manner as the heart higher up, just ringlet away from the fold line creating the coils on the outside then that the finished result looks similar a letter of the alphabet V with outward facing curls on the open ends.
There are other open coils you lot can brand, but this page is getting rather long so I'll exit them for a split page.
Enjoy learning quilling
I promise these basic paper quilling instructions will help y'all on your way to an heady and beautiful new hobby. Check my free quilling patterns page for projects to make.
Paper quilling ideas
How to make envelopes
Return to paper quilling ideas
Paper Quilling New Baby Cards
FREE Quilling Patterns
Return to Handmade Craft Ideas Dwelling Folio
Recent Articles

-
Getting Started Crafting Again
Aug 11, 21 02:02 PM
I would like to share my crafting story. I used to craft quite a fleck, simply quit a few years ago. Then, an acquaintance suggested I check out Pinterest.
Read More than
-
Coloring Book Art
May 17, 18 03:33 PM
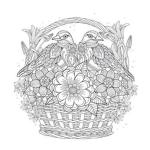
I was off from piece of work in 2010 due to possible surgery. I was looking for an arts and crafts project. I bought coloring books for my granddaughter; who was
Read More
-
Heart Shaped Boxes for Loved Ones
May 17, 18 01:33 PM
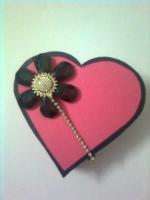
I am crazy about making cards and other crafts and dear to share these with other people. I fabricated this heart shaped box with rich pinkish card stock, decorative
Read More
Source: https://www.handmade-craft-ideas.com/paper-quilling-instructions.html


Comments
Post a Comment